
DIY Headboard: Geometric Shape & Fun Color!
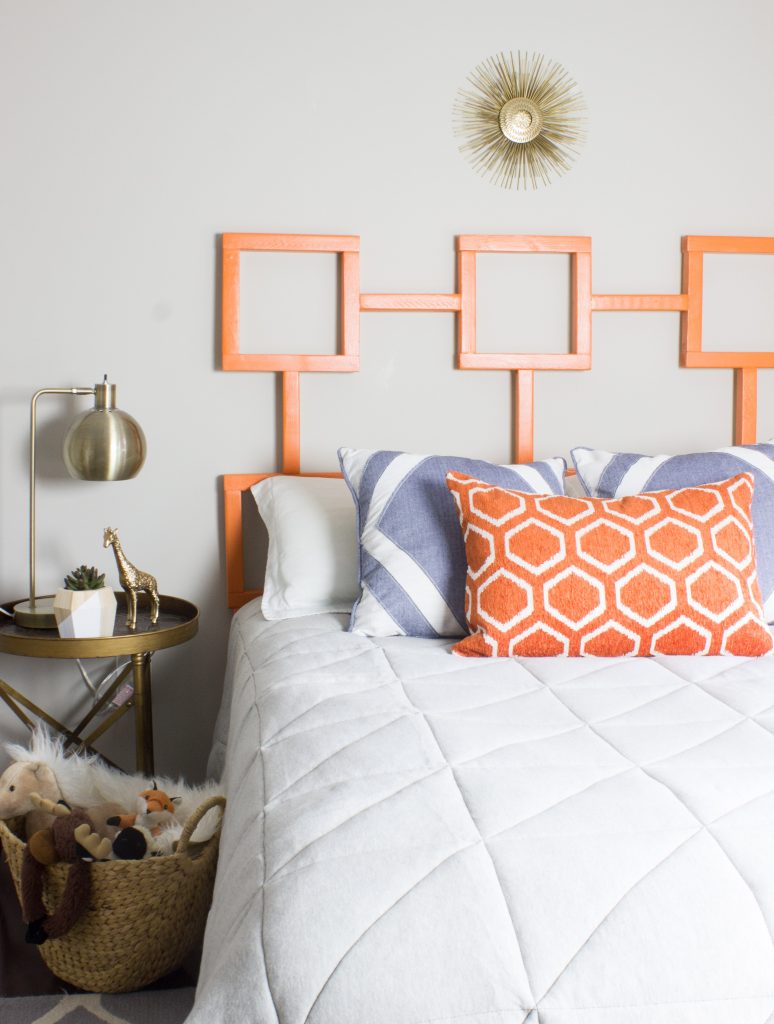
Ive been saying for approximately forever that I was going to build my youngest son, Jonah, a headboard for his bed. It just took me forever to decide on a style. I thought that since hes only 5, I would love forhis headboard to have a fun shape and color. His room has a lot of gray in it, so I wanted to bring in a pop of orange as an accent color. Heres what I came up with.

Disclosure: This post is sponsored by Home Depot. All opinions are my own.
Project Materials & Supplies:
- 2 x 2 boards
- 1 x 2 board
- Speed Square (I used thisHusky 2-in-1 extendable square)
- Pocket hole jig (optional)
- 2 Pocket hole screws (optional) Note: I used 1 1/4 and they werent quite long enough to hold as strongly as I wanted. Youll see below what my fix was for that.
- Countersinking Drill Bit
- 2 Wood Screws
- Drill/Driver
- Sander
- Sanding Block or Sandpaper
- Wood Filler
- Putty Knife
- Primer
- Paint
- Saw
Step 1
First, I cut my 2 x 2 boards down to the following dimensions: 12 at 12 long each; 19 at 9 long each; and 2 at 20 long.
And I cutmy 1 x 2 to 50 long.
(The 20 long pieces are for the legs and in hindsight I should have made them longer so the pattern wouldnt be hidden by pillows on the bed. Be sure to measure the exact height you want your headboard to be when determining leg length.)


Step 2
I sanded. And sanded. And sanded.

Step 3
Ok, heres where some trial and error took place. First, I used my pocket hole jig to drill holes at each end of my shorter 22 pieces. Then I used 1 1/4 pocket screws to attach them to the longer 22 pieces, creating 6 squares. I connected two rows of 3 squares, and then connected those using shorter 2x2s.


The problem was the pocket hole screws were not holding everything together strongly enough and it seemed really flimsy. I went back in and unscrewed them, added wood glue, and re-screwed them, but it didnt make a difference. I added some brad nails for added reinforcement. Still, made no difference. So what I ended up doing that I wish I had done from the beginning, was pre-drilling holes using my countersinking drill bit and then attaching everything with 2 wood screws. I got a much sturdier hold this way and everything felt much less flimsy. Longer pocket hole screws probably would have helped too, although they just seemed somewhat loose in general.


When I was constructing everything, I used my Husky 2-in-1 adjustable square to make sure everything was straight. It convertsto botha 6 inch and 12 inch layout square. Its extension arm locks into the body for easy storage, and if you happen to be using it outdoors for roofing or something like that, the lightweight aluminum construction reduces heat and cold retention.


By the way, lets talk about my fancy new workbench. Isnt it awesome? Its the Husky 9-drawer Mobile Workbench, and those of you who have seen me work solely on the ground and then later on a pathetic 210 board draped across two broken plastic sawhorses, you know this is a major upgrade. I was seriously giddy when I received it. It has a 1 inch solid wood top with protective coating, and is made of heavy-duty all-welded 21 gauge steel construction. It also has an internal keyed locking system for added security.Plus its also on wheels so I can easily move it around my workshop.
Step 4
I measured 5 from the bottom (because the brackets on Jonahs bed frame are 5 from the floor, and I wanted to be able to connect this headboard to them), and predrilled holes from the outside using my countersinking drill bit, and then attached my 12 board to the legs horizontally using 2 wood screws.
Step 5
I gave everything a final sanding and then went around and patched over the screw holes and also over any knots with wood filler. I allowed it to dry and sanded it all smooth with a sanding block.
Step 6
I primed everything with a coat of Kilz primer.

Step 7
I painted it a fun shade of yummy orange.

I used Behr Marquee paint in the color Japanese Koi in a satin finish. Then I finished it with a water-based Polycrylic topcoat.
Step 8
Install it! You can either bolt it to your bed frame or anchor it to the wall. I am still debating which one I plan on doing so for now Ive just propped it behind the bed. I did raise it a little bit so more of the pattern would show and I may end up swapping out the legs for longer ones eventually. Here it is in Jonahs room!


I am so happy to be making some progress in this room. I still have some work to do but we are getting there! If you built this what color would you paint it? Let me know in the comments!
YouTube video here:
Disclosure: I acknowledge that The Home Depot is partnering with me to participate in the promotional program described above (the Program). As a part of the Program, I am receiving compensation in the form of products and services, for the purpose of promoting The Home Depot. All expressed opinions and experiences are my own words. My post complies with the Word Of Mouth Marketing Association (WOMMA) Ethics Code and applicable Federal Trade Commission guidelines.


Thanks for visiting!
-Erin
The post DIY Headboard: Geometric Shape & Fun Color! appeared first on Erin Spain.